Labels

Saturday, 3 January 2015

I bought a pasta maker and made some crackers!


So, I am trying to wean myself off buying any more kitchen gadgets. I have a few. I use them all (maybe only twice a year) but kitchen real estate is scarce. So adding something to the kitchen family is generally considered.


I always thought that pasta makers were a bit of a waste of time as it takes so much time to make the pasta in comparison to the payoff. I mean, it's pasta.  I have an ice cream maker that I only use a few times a year, but when I do, it's magical. Let's not talk about the fairy floss maker from Aldi. It will get used one day . . . maybe.


So when a work friend mentioned that she bought a cheap pasta maker from Big W for $20, the idea stuck in my mind. I wanted to make it. I wanted to have one. I am but a sheep and very susceptible to suggestion!


So, machine was purchased and spinach pasta was made for a spinach lasagna. It was super tasty and successful (although I will roll it a bit thinner next time).


What I have made multiple times though is crackers!


I made these a few months ago and rolled them out  between baking paper and they were successful (so if you don't have a pasta maker you can use that method) but I really enjoy using the pasta maker to roll them out.


Cheapo pasta maker from Big W

I used a recipe from The Kitchen as my starting off point and take it from there. I generally only make half a batch at a time (which is about 2 full oven trays of crackers).


I have tried it with both rye flour and spelt wholemeal flour. I really liked the rye, but the wholemeal was also delicious.

You can add whatever additional flavours that tickle your pickle. My favourites have been:

-sesame seeds
-rosemary and sea salt
-parmesan

So, go ahead and give these guys a go, you will not be disappointed, they are worth the 10 minutes it takes to make the mix and roll them.

Here is the recipe that I modified via The Kitchen

Ingredients

1.5 cups rye flour (can also use wholemeal, spelt etc)
1 teaspoon sugar
1 teaspoon salt
1/2 teaspoon cracked pepper
1 tablespoon sesame seeds
2 tablespoons extra virgin olive oil
1/2 cup water

Method

1. Preheat oven to 200 degrees Celsius approx. Add all dry ingredients to bowl, mix to combine.
2. Make a well in centre of dry ingredients and add wet ingredients.
3. Mix at first with a wooden spoon until flour is all combined, then tip onto bench and knead lightly until smooth. Add a small amount of extra flour if sticks to bench.
4. Let rest for 15 minutes
5. Pasta maker method - take 1/4 - 1/3 cup of mixture and flatten out lightly until around .5 to 1cm thick. Use pasta maker to roll out, dialling down thickness of pasta maker as you go until it is around the thickness of a lasagna sheet. 
5. Rolling pin method - get two pieces of baking paper and roll out dough in between so it is as thin as you can get.
6. Place on a baking tray, cut out with a knife or pizza cutter to whatever shape you like. I liked the kind of trapezoid shapes. Prick all over with a fork.This stops them from rising and makes them crisp up.
7. Place in over for around 10 - 12 minutes or until browned to your liking. Keep an eye on these suckers as they burn quickly. 

Note: you can use whatever flavourings you want in these. I have used rosemary and sea salt, Ras Al Hanout seasoning, Tex Mex seasoning, oregano, parmesan. Whatever you have on hand.


Ombre Swiss Buttercream Mud Cake with DIY Mini Bunting


Girls cakes. I don't get much of a chance to make them and sure do enjoy it when I do. I wouldn't say that I am a frou frou girl (although my collection of makeup, shoes and bags may contradict this) but I do enjoy embracing the feminine occasionally.


So two hints I got for the interests for the birthday girl was a piano style cake board, music and purple.

I mashed together a few influences and came up with this. 

The cake board was made about 3 days prior to allow the fondant to harden. I also mixed some tylose powder in it to help it along a little. The lines of the keys were indented with a pizza cutter and the black keys also cut out with a pizza cutter. No measuring, just freestyle.


The mud cake was a tried and tested Exclusively Food recipe that I always use for chocolate or white chocolate mud cakes and it's awesome as there is a PDF that shows different quantities for different pan sizes.

I pinned a few buttercream technique images that I was interested in (see my Pinterest board for a look of all things cake that inspire me on the interwebs!), but ended up going with the bottom layer of this Cakestyle TV video on Youtube (this specific method starts from 20 mins 20 sec). If you are interested in cake making, their tutorials are great.

Everyone loves a surprise in the middle of their cake (unless it was a baked in bug . . . . ), so the bottom layer is 4 layers and the two in the middle were hollowed out with a round cutter and Maltesers hidden inside.

The frosting recipe I used was a Swiss Meringue Buttercream recipe from Sweetapolita and I coloured it with Royal Purple from Americolour.
P.S. Is anyone a control freak that writes instructions on how the cake is cut or is this just me . . . . . 
The mini bunting was a free printable that I came across from Pinterest from here. I printed it on photo paper as I had no cardstock and I attached it to two bamboo skewers with some silver christmas string. I wanted to attach it to two swirly straws but I couldn't find the colour I wanted. 


And done.

I find that my cakes are always a huge mash of inspiration from many places these days and it was a lot less stress making this from buttercream in 70% humidity and 34 degrees celcius!


Got to love humidity encouraging 'cake sweat' to form!


Saturday, 22 November 2014

Kids birthday cakes . . . . . .a progressive look at an amateur bakers improvements over 5 years!

Dinosaurs, pirates and action figures. These are the cakes that I get to go most crazy with.

I have two crazy, wonderful, nutty nephews who I make birthday cakes for each year and they are pretty decisive with what they do and don't want their birthday cakes to be. I tried to convince one nephew this year that he wanted a monkey brain cake for his birthday in the middle of the year, failed, so convinced my other nephew that he wanted it for his birthday in a few weeks time (he had specific requirements of stitches in the face and a nail in the brain . . . .weird, but doable). 

I haven't done any courses and have learnt a bit along the way with various mediums. It used to be blogs, moved onto Pinterest and now Youtube has taught me a bit as well.

Below are a few cakes that I have made, oldest to newest so you can see (hopefully!) that there has been a bit of trial and error improvement.

Here are some awesome places for inspiration as well.

1. My Pinterest board for kids cakes.Generally grouped around whatever I am researching at that time!

2. My general Pinterest board for cakes. Great base recipes for the actual cakes and butter creams.

3. A few baking websites that  I continually go back to - Bakerella, NotQuiteNigella, Raspberri Cupcakes (amazing!!!!!!!!).

4. Youtube is great to look at various techniques, I am really liking Anne Reardon from How to Cook That, Cakestyle TV and Rosanna Pansino.

Anyway, here's a bit of my history of kids cakes (I think some are missing, especially a spider cake I made with a Dolly Varden pan . . . . )


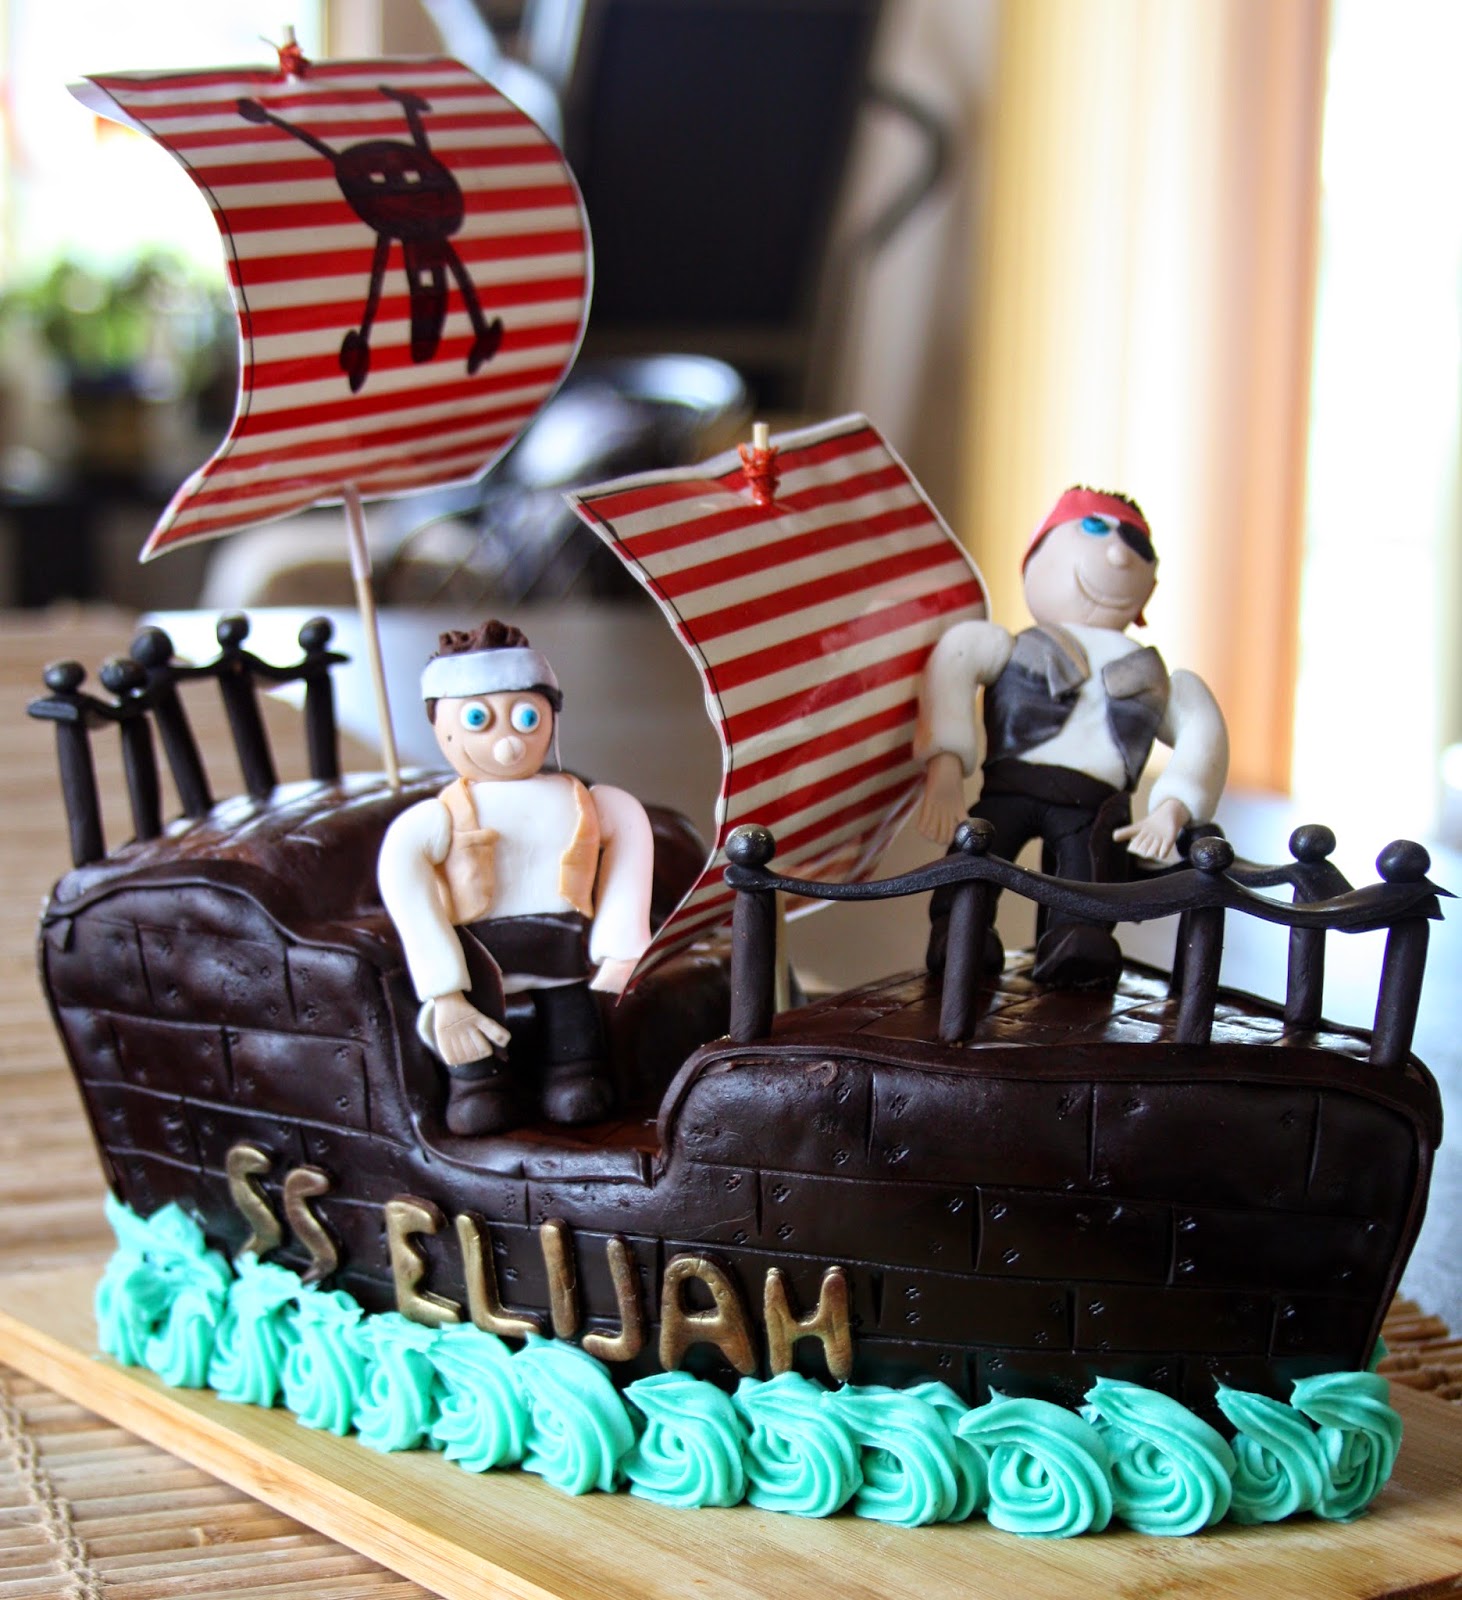
I think my nephew Elijah was 3 or 4 for this one. I remember it was a mission keeping the figurine on top of the cake. Elijah is also born in December, the month of excessive heat and humidity so working with fondant is often tricky!


I loved this pirate cake (also for Elijah). The mix of cool blue, red, white and black made it pop. Loved the top.


Izayah picked this one specifically from the Womans Day Kids Cake Cookbook *the new version, not the original*. 


This one was amusing.


Again, Elijah, I think it was stinking hot this day, hence the sweating fondant.


I loved this cake with all the stars. Didn't really match the whole Spiderman theme, but no-one cared.


This was a challenging cake. I formed the Hulk hand from a rice bubble / marshmallow mixture. Oh, the humanity. I then dusted it with cocoa for a dirty look. Loved it.


More pirates. This was harder. The cake shape wasn't too bad but the figurines were! All the tutorials on youtube made it look so easy. Isn't that always the way.


A One Direction cake for a friends daughter. Again, it was stinking hot and humid in January, so a bit melty!


Another dinosaur. Izayah wants to be a Paleontologist (last I heard) so it's very appropriate for him. This one turned out well and was lots of fun to make. I need to remember to make an effort with the cake boards. The biscuit crumbs / dirt and buttercream / grass really made it.


This was my most recent cake for a colleagues grandson. Loved it. Loved the colours. The fondant was a bit dodgy in parts but the cutout dinosaurs and leaves helped camouflage that!


Tuesday, 4 November 2014

Brown butter cake with salted caramel Swiss meringue buttercream, dulce de leche, Maltesers and meringues inspired by Katherine Sabbath!


Cake.

Love it and I am suspicious of those who don't. You know those people. There is one in every crowd. They get offered cake and they say, 'No, I'm not really into cake . . . '.I usually stand there mouth agape and wonder what on earth is wrong with them.  

These days I tend to love making cakes for other people. Luckily I have two little nephews who I can experiment on and who are brutally honest with what they do and don't like. The other favourite taste testers are my buddies at work. They never knock back cake and it means that if I have a Sunday baking session, I can get rid of the evidence the next day to an appreciative bunch.

There are a few food blogs that I read voraciously (Sweetapolita, Chocolatesuze, Not Quite Nigella, Raspberri Cupcakes), but I have only just recently gotten into Instagram and discovered the wonders of Katherine Sabbath. She is a wonder.

I came across Katherine when Raspberri Cupcakes created this absolute stunner of a cake and it was inspired by one of Katherine's. From then on, I think my most searched for hash-tag on instagram is #katherinesabbath as there are so many cakes made that are inspired by her. It's like a little community. Katherine often comments on these cakes and features them on her own instagram page which I think is awesome too. Plus, I think I saw on her instagram that she is starting her own website next year with recipes. Blows my mind!I think she is the Willy Wonka of cake making. Her cakes are so original and filled with a childish joy but are very refined at the same time which is super hard to do. Creativity and restraint are two qualities that I find hard to combine. 

So, this is my first Katherine Sabbath inspired cake. I am sure there will be many more in the future. Like everything, it's a bit of a mashup of recipes from a few places.

Excuse the dodgy photos!

Brown butter cake with salted caramel Swiss buttercream, dulce de leche and Maltesers and meringues inspired by Katherine Sabbath!


Please find the recipes for the different components below, I will add my own construction advice. The beauty of this cake is that you can choose what bit to make, what bits to leave out, what to substitute and what to buy as you can't be bothered! I think it would also look great with fuschia buttercream and turquoise meringues. Next time maybe.

1.Brown Butter Cake 
(via Raspberri Cupcakes)

I made a three layer cake in three 18cm pans. I only had two 18cm pans so cooked the first two and then turned them out and cooked the third afterwards. These cakes cooked pretty evenly for me so I didn't need to trim the tops. If yours are too curved, trim them a little so they stack neater. I found the tops started to brown a little quickly on one, if this happens, just cover in foil until cooked to protect the top.

2.Salted Caramel Swiss Meringue Buttercream
(via Sweetapolita)

I've made many a buttercream icing recipe and this Swiss meringue is the business. Not too sweet and unbelievably smooth, not heavy and buttery and gritty like some can be.

I halved the recipe and I still had some icing left over that has gone into the freezer for later. Sweetapolita's instructions are so detailed I won't add anything else. 

To make it a salted caramel flavour, I added 1/3 of a cup of dulce de leche and some sea salt to taste at the end after all the butter had been added. If you use salted butter in the recipe, be careful of how much sea salt you add.

3.Dulce de Leche

I live on the edge. I boil my sweetened condensed milk in a can for 2.5 hours et voila! Dulce de leche. Well, the Australian version anyway. My family has been making caramel in a can like this for years and years. The main thing is, keep the saucepan full of water on a simmer DO NOT LET IT BOIL DRY and don't open the can until it's cooled. There's a post here that goes into a bit more detail

4. Meringues

I have made many a meringue recipe, this one never fails. Despite this, I keep trying new recipes thinking that they will be better. They aren't!.

This is the basic recipe, feel free to use one of your own, buy them or leave them out (home made meringues that are crunchy on the outside and chewy on the inside cannot be beaten though . . . )

Ingredients
3 egg whites (approx 120gms)
175 grams sugar, caster or regular, doesn't matter

Directions
*Preheat oven to 120 degrees C (248 degrees F).
*Line a baking tray with greaseproof paper.
* Combine egg whites and sugar in a pyrex bowl and place over a saucepan of simmering water, ensuring that the bottom of the bowl doesn't touch the water. If you have a double boiler, use that.
*Whisk the egg white mixture regularly until the mixture looks white and opaque and when you rub some of the mixture between your fingers it is quite warm and you can no longer feel any sugar particles.
*Place mixture into Kitchenaid bowl and mix on a medium speed until the bowl and the mixture is no longer warm. This takes about 10 minutes and the mixture will be super glossy and thick. You could do with hand beaters also, just make sure you beat until no longer warm.
*Put mixture into piping bag with a large round tip (or just snip the end off a plastic disposable piping bag) and pipe mounds onto a baking tray. They don't spread much so you can pipe them close together.
*Put in oven and cook for around 40 mins. Test that they are cooked by taking them out and checking that the outside shell is firm and the bottom has formed a hard later. If you wiggle it and it collapses, put it in the oven longer, it really depends on the size. Once they have cooked to your preference, turn off oven and open door slightly and let meringues cool in there.

5. Chocolate ganache

I didn't really measure the ganache. I heated around 1/4 cup of cream and 100 grams of chocolate (half 70% and half milk) in the microwave for a minute with 1 teaspoon of butter.  This  was a little thick, so I added cream and stirred until it was thinner. Next time I think I will make it even thinner as when it hit the cooled buttercream it set quickly. Make sure this is at room temp, not hot, before you use it.


Construction, the fun bit.

You should have the following components

3 brown butter cakes
Salted Caramel Swiss Meringue Buttercream
Dulce de Leche
Maltesers (crushed in a bag with a jar or mallet)
Ganache
Meringues


1. Find a cake plate or a cardboard cake round to rest the cake on.  It's a lot easier if you have a turntable to rest the board on, if not, an upturned bowl with a wide base would work well to elevate it.

2. Attach the first layer of cake to cake board with a small amount of buttercream. The layer on about 1/4 of a cup of dulce de leche and smooth out. Spread about 1/2 cup of buttercream over the dulce de leche. Sprinkle maltesers on buttercream/

3. Place next cake layer on first and repeat (dulce de leche, buttercream, maltesers). Try and keep the maltesers and caramel away from the edge so that they don't go into the outside icing.


4. Place third and final cake on first two layers. Level cakes so they are stack evenly. 


5. Crumbcoat cake with buttercream (if you need any help with icing with buttercream, get yourself to CakeStyle on youtube. Awesome). Place cake in fridge to firm up.

6. Take cake out of fridge and do final coat of buttercream. Place in fridge to firm up.

P.S. This is my new favourite cake smoothing tool. $10 from Bunnings, Does the job superbly. Check out the painting / plastering section!


7. Once firm you want to place the ganache on top. I did this by smoothing it on the top with a small offset spatula and then coaxing it towards the edge to drip down. Place in the fridge again to set.

8. Just before serving you want to place the meringues on top. You don't want them on the top for too long or the meringues will go soft.

This cake tastes best when it has been out of the fridge to come to room temp and I reckon it would feed at least 16 people!


Wednesday, 8 October 2014

Missoni for Target Australia 2014


I am cheap. I admit it. If I think something is ridiculously priced, I will always try and find a cheaper alternative, that's why I often refurbish vintage furniture.

Something that can't really be replicated though is Missoni. So when I heard that Target Australia was going to do a collaboration with Missoni I may have squealed, just a little. . . . 

The last collaboration that Target did that I got really excited about was with Stella McCartney, I still have my lovely silk scarf. The lookbook for the Target  / Missoni collab came out a few weeks ago and I knew that the homewares were my target of choice. They don't date, you don't have to worry about sizes and you can swap them out whenever you want.

I bought a few more pieces than I was expecting, but hey . . . . . . I got them in person and the Target website has been down most of the day, so I am ok with it.

I was expecting a bit of a zoo at my local Target, but I was only one of 4 people waiting for it to open at 8am and I was out the door at 8.15am. Very successful morning.


What follows is what was adopted!


Throws - $69

This black and white throw was on my definites list. I am a monochrome girl and you can't go wrong with black and white with other pops of colour. What I didn't realise when I purchased it, was how huge it is. It is 1.3m x 1.8m so can also be easily used as a bed throw.


Then I saw this throw that I thought looked a bit meh online, but in person it asked me to be taken home,put on my lounge and petted. I obeyed.


Don't they look happy together. Ahhhhh.


The fabric knitting technique is fab.


Plates - $30 for 4


I didn't plan on getting any plates but they were quite nice in person with a nice weight to them. They are porcelain and feel to be quite good quality. 


I have different plates that are all black and white patterns with some blue and red, so these little suckers shoudl fit in well. I nearly bought some melamine picnic plates that were beautiful, but I don't really have much need for them so I was a bit sensible and said no.


Serving Platter - $35


These serving platters were also calling my name and a bit more useful than the plastic plates. The smaller platters nest into the larger one making it easy to store, which means if it doesn't take up extra space, it's not really there so the purchased doesn't really count . . .  .!


Canvas flats - $40


There were only a few pairs of shoes on offer. Some ballet flats, these Soludos style flats and some high wedges. These flats worked the best for me although I wish that I thought the wedges were comfortable as they were beautiful. These should get a heap of wear.


 Knit pleated skirt - $79


I never thought I would buy a clothing item but this skirt is me. Slightly full, knitted with a loose pleat and monochrome. The slip underneath is quite short so might need to remedy that though!


All in all, I love all my purchases and am glad that I went before work rather than relying on online purchases as that looks like it isn't working too well!

Hope it gets sorted out soon for those who are wishing to indulge!